HOW TO PRACTICE SCALES: (5 STEPS TO MAKE THEM REALLY FAST!)
The techniques I use to make my scales fast, confident, and impressive are things you can use too! And I’m going to share them with you right here.
But first, I want to help you get excited about scales. Every piano teacher assigns them and every piano student practices them, but has anyone ever told you why? I promise, they’re not just busy work!
WHY PRACTICE SCALES?
Scales are one of the most basic building blocks of Western music. They show up in music everywhere–from classical to jazz, from Broadway to pop and rock. In Latin music and klezmer music. In every type of music you can think of.
So when you work on scales, you’re not just doing an exercise. You’re learning something that you can use right away in hundreds and hundreds of pieces of music.
SCALES IN ACTION!
This is one of Mozart’s most famous, frequently-played piano sonatas. And it’s one of the more user-friendly ones, too. If you’ve taken piano lessons for a few years, it might be one of the first big pieces you’ll learn. And right on its first page there’s scale after scale after scale.
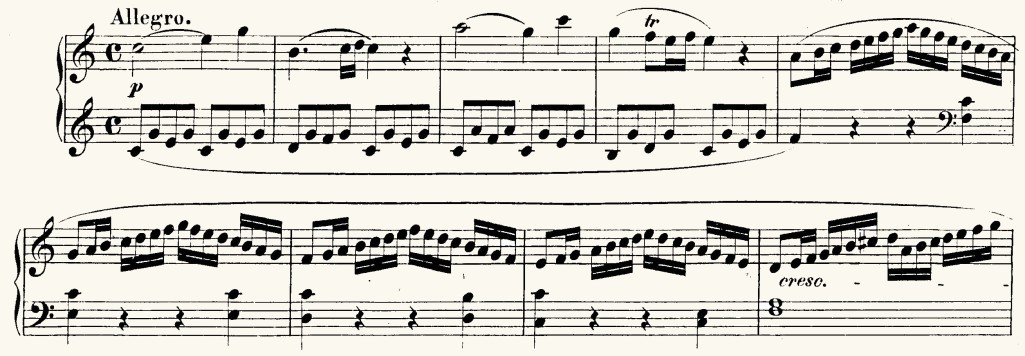
If you’re already comfortable with the scales on this page, you won’t have to worry about them when you learn the sonata. You can just plug them right in.
Of course that doesn’t mean you won’t practice the sonata, or even that you won’t practice the scales while you’re working on the sonata. But you won’t have to figure them out like other tricky sections that has patterns you haven’t already mastered.
Just for another example, here’s one of my favorite Chopin Nocturnes. All those grace notes look a little intimidating, don’t they? But it’s just a scale going up and down.
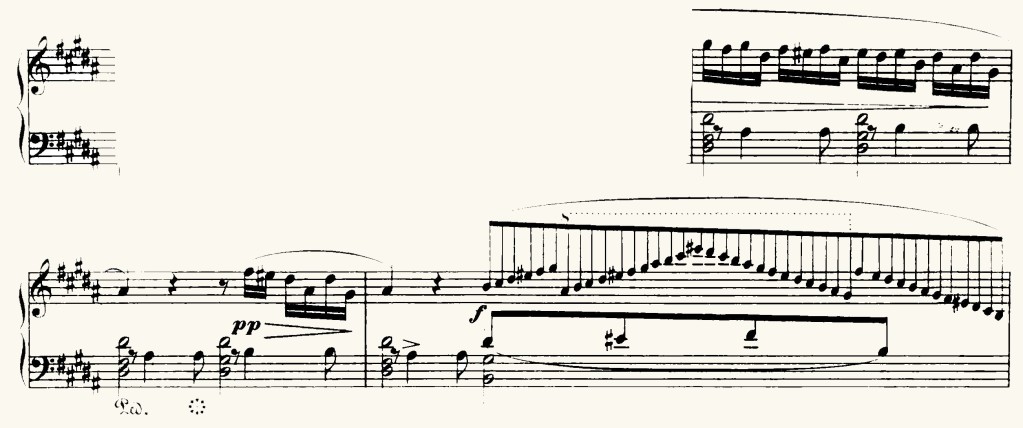
And if you’re comfortable with scales, you already know how to play this part of the Nocturne, even if you’ve never seen it before!
5 STEPS TO FASTER SCALES
STEP 1: SLOW PRACTICE
C Major is the first scale most people learn, so let’s use that for our example. The first thing to do is to spend a couple of days playing it REALLY slowly.
DISCLAIMER: I am an experienced concert pianist and piano teacher, but I am not a doctor, and using the exercises on this blog post is not a substitute for supervision by a qualified piano teacher. If any aspect of your piano practice causes you physical discomfort, stop immediately and seek medical input along with live input from a qualified piano instructor.

When I say really slowly, I mean slowly enough that you can be 100% absolutely sure about what finger goes where. Where will you turn your thumb on the right hand? Where on the left hand?
As you practice this scale, say things to yourself like: “OK, I’ve played C and D. I’m about to play E. I’m going to turn my thumb in my right hand after E, but I’m not going to turn my left thumb until after G.”
See, practicing slowly is not just slowing things down. It’s giving enough space for all those thoughts to get really solid in your mind.
- Go through the scale like that three times in a row.
- After each time, think through what was easy and what was difficult for you.
- Ask what you need to focus on to make the difficult parts easy.
Do this slow practice for two or three days. It probably won’t take more than ten minutes each day. And then you’re ready for the next step.
SCALES IN EIGHTH NOTES
One of the biggest challenges when you’re playing scales is to keep them even. We don’t want the thumb to accent when you turn it. We don’t really want ANY accents, just a perfect, pearly, even scale.
But instead of trying NOT to accent with the thumb, we’re going to give EVERY finger a chance to accent a note. That way, we’ll break the habit of one finger or one note being more prominent than the others.

- For this step, play the scale in eighth notes, with a slight accent or pulse every two notes.
STEP 3: SCALES IN TRIPLETS
Once you’re completely confident playing a scale in eighth notes, you can start playing the scale in triplets, this time for three octaves.

Don’t stop playing the scale in eighth notes, by the way. Just add a round of triplets after your scale in eighth notes.
- You’ll notice that different fingers play the accents when you’re in triplets.
STEP 4: SCALES IN 16TH NOTES
And then, when you’ve mastered the triplets? Well, you’ve probably already guessed: add four octaves of sixteenth notes.
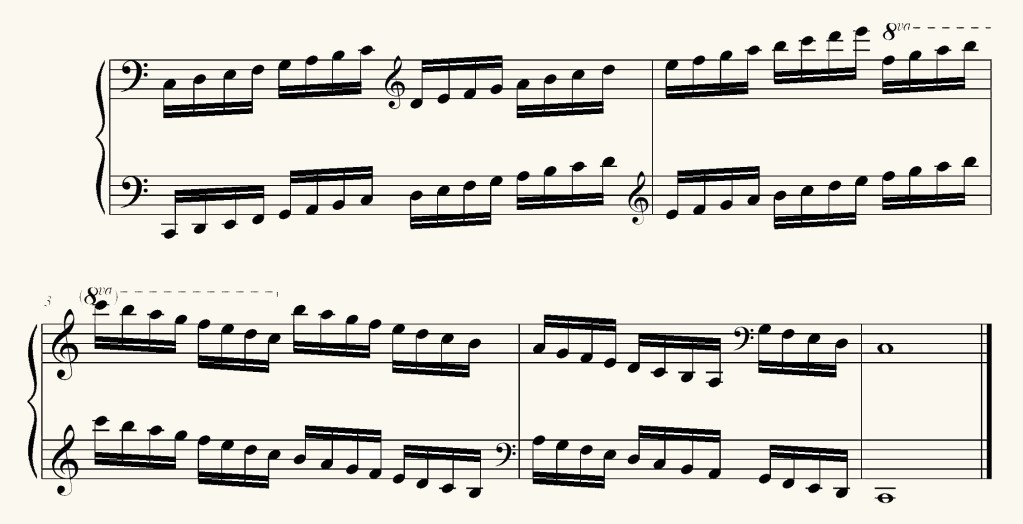
Now your sixteenth notes will of course be twice as fast as your eighths, but they don’t need to be incredibly fast. This next step will get you the rest of the way!
STEP 5: SCALES IN GRACE NOTES
This is my favorite way to practice scales. You rest on the long note for as long as you need to visualize the motions you’ll use to get to the next note, and then you zoom on ahead to the next long note. It works for arpeggios too. Scales and arpeggios go hand in hand, after all! I go into detail about that in my post on how to practice arpeggios.
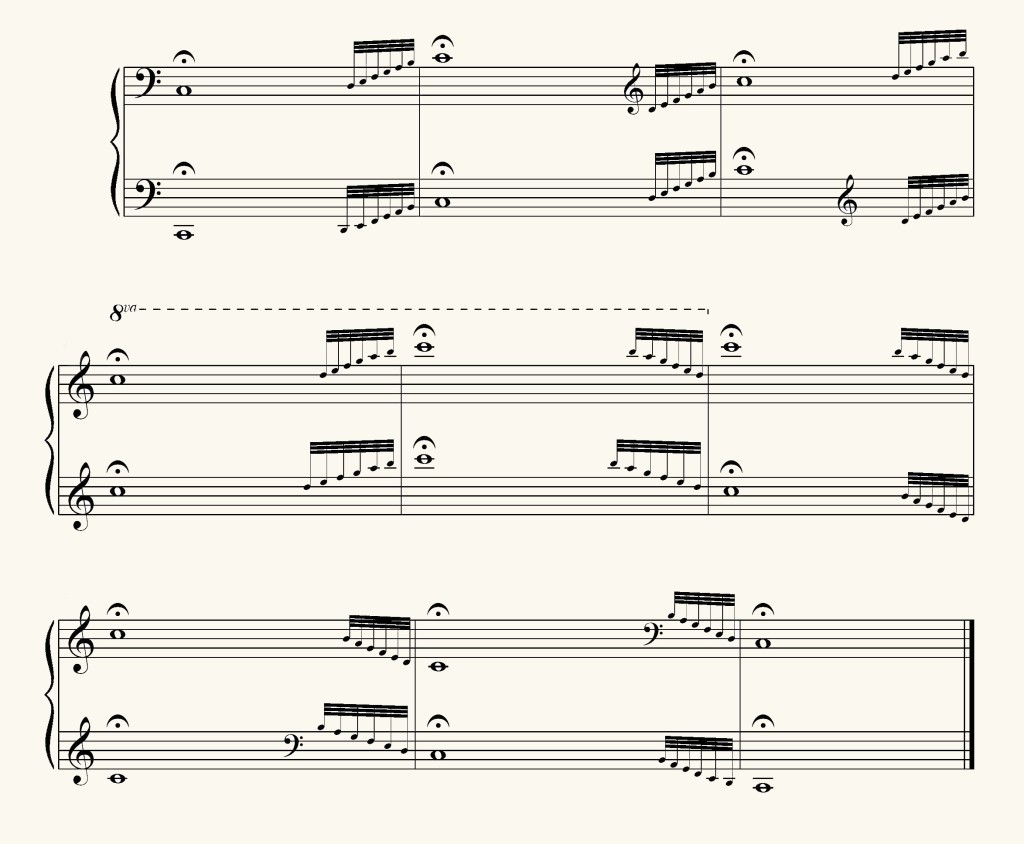
This isn’t a rhythmic exercise. You can spend all the time you need on the long note. And it can be a different amount of time each time.
- As you rest on the long note, imagine where you’re going to turn your thumb in each hand.
- Picture what it will feel like to turn your right thumb before your left thumb.
- Feel your hands get ready for that motion.
- Imagine leaning slightly with your right hip as you zip over to the next octave
And then, when you’re on the next long note, imagine those motions again and, when you’re ready, zoom ahead to the next octave. And the next. And so on.
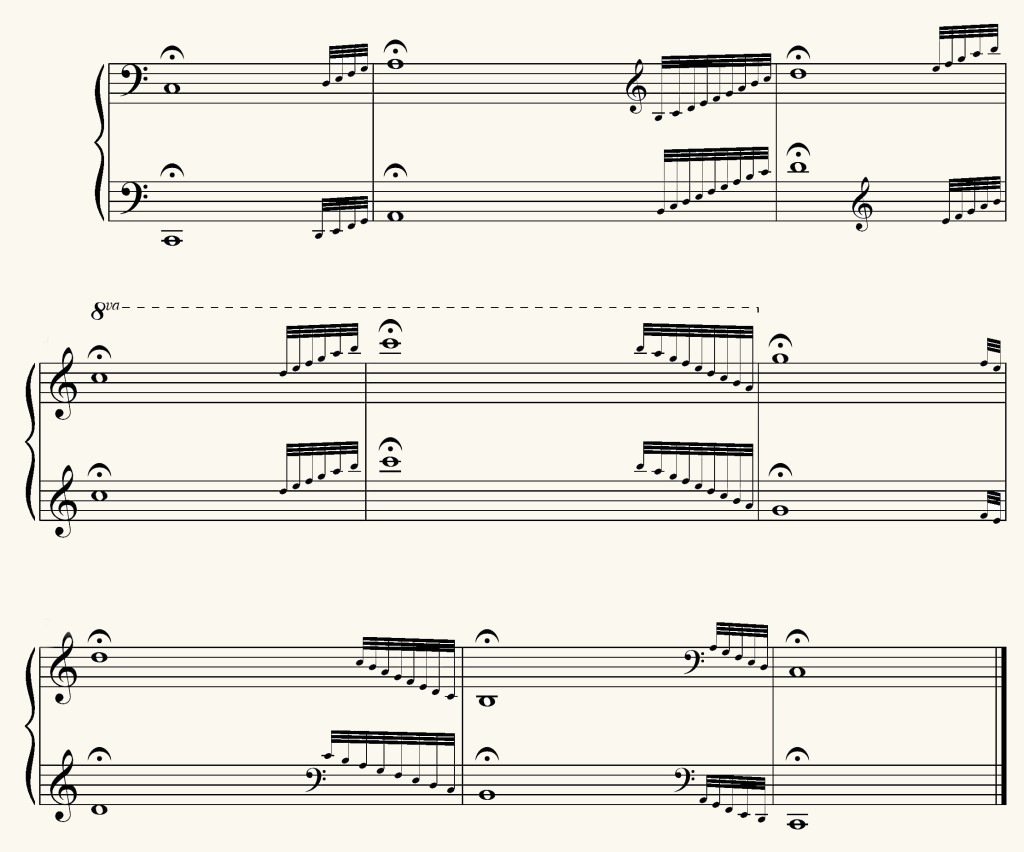
BONUS! A GRACE NOTE VARIATION
You can make the interval between long notes as long or as short as you need.
- If you’re having difficulty in the middle of the scale, go through four or five notes at a time.
- If you’re working on absolute lightning speed, you might go through nine or even ten notes.
YOUR SCALE PRACTICE ROUTINE
Start your scale practice with these exercises, in this order:
- the eighth notes
- the triplets
- the sixteenth notes
- the grace-note exercise
Do these all in a row each day. Remember, this is after two or three days of nothing but slow scales.
And then, once you’ve done scale exercises, finish your scale practice with one more slow scale, to cement the finger patterns in your mind. At the end of the week, try playing the scale and see how fast you’re comfortable playing it!
And then start again the next week with a few days of nothing but slow scales. After a few days, go back to the exercises in this post. Your scales will get faster, more secure, and more impressive every week!
A PDF and a video!
These are just a few of the keys to figuring out a really good fingering for any music you’re working on. Remember, your fingering should fit YOUR hand, be comfortable for you, be efficient, and help you play beautifully without having to worry about finding the next note.
I’ve put these keys into a free PDF that you can download: 5 Exercises for Faster Scales. And I’ve made a video with all this information and some demonstrations. It’s right below, and you can also find it on YouTube as How to Practice Scales (5 steps to make them really fast!).
Meanwhile, if you have any questions please comment below this post. And please share this post if you found it helpful!
And if it would be helpful for me to work closely with you as you learn your music, please send me an e-mail through the contact form in the top menu to set up individual consultation.
And please subscribe to my e-mail list below so you can know as soon as I put up my next post. Until next time, happy practicing!
